Installation
Timefold Orbit platform is a scalable execution environment for planning optimisation. It is built around models that implement given use case such as:
-
employee scheduling
-
field service routing
-
order fulfillment routing
-
and more
Kubernetes is the target environment for the platform. It takes advantage of dynamicity of the cluster and at the same time its components are not specific to any of the kubernetes distribution.
Timefold Orbit platform has been certified on following Kubernetes based offerings
-
Amazon Elastic Kubernetes Service (EKS)
-
Google Kubernetes Engine (GKE)
-
Azure Kubernetes Service (AKS)
| Timefold Orbit is expected to work on any Kubernetes service, either in public cloud or on premise. |
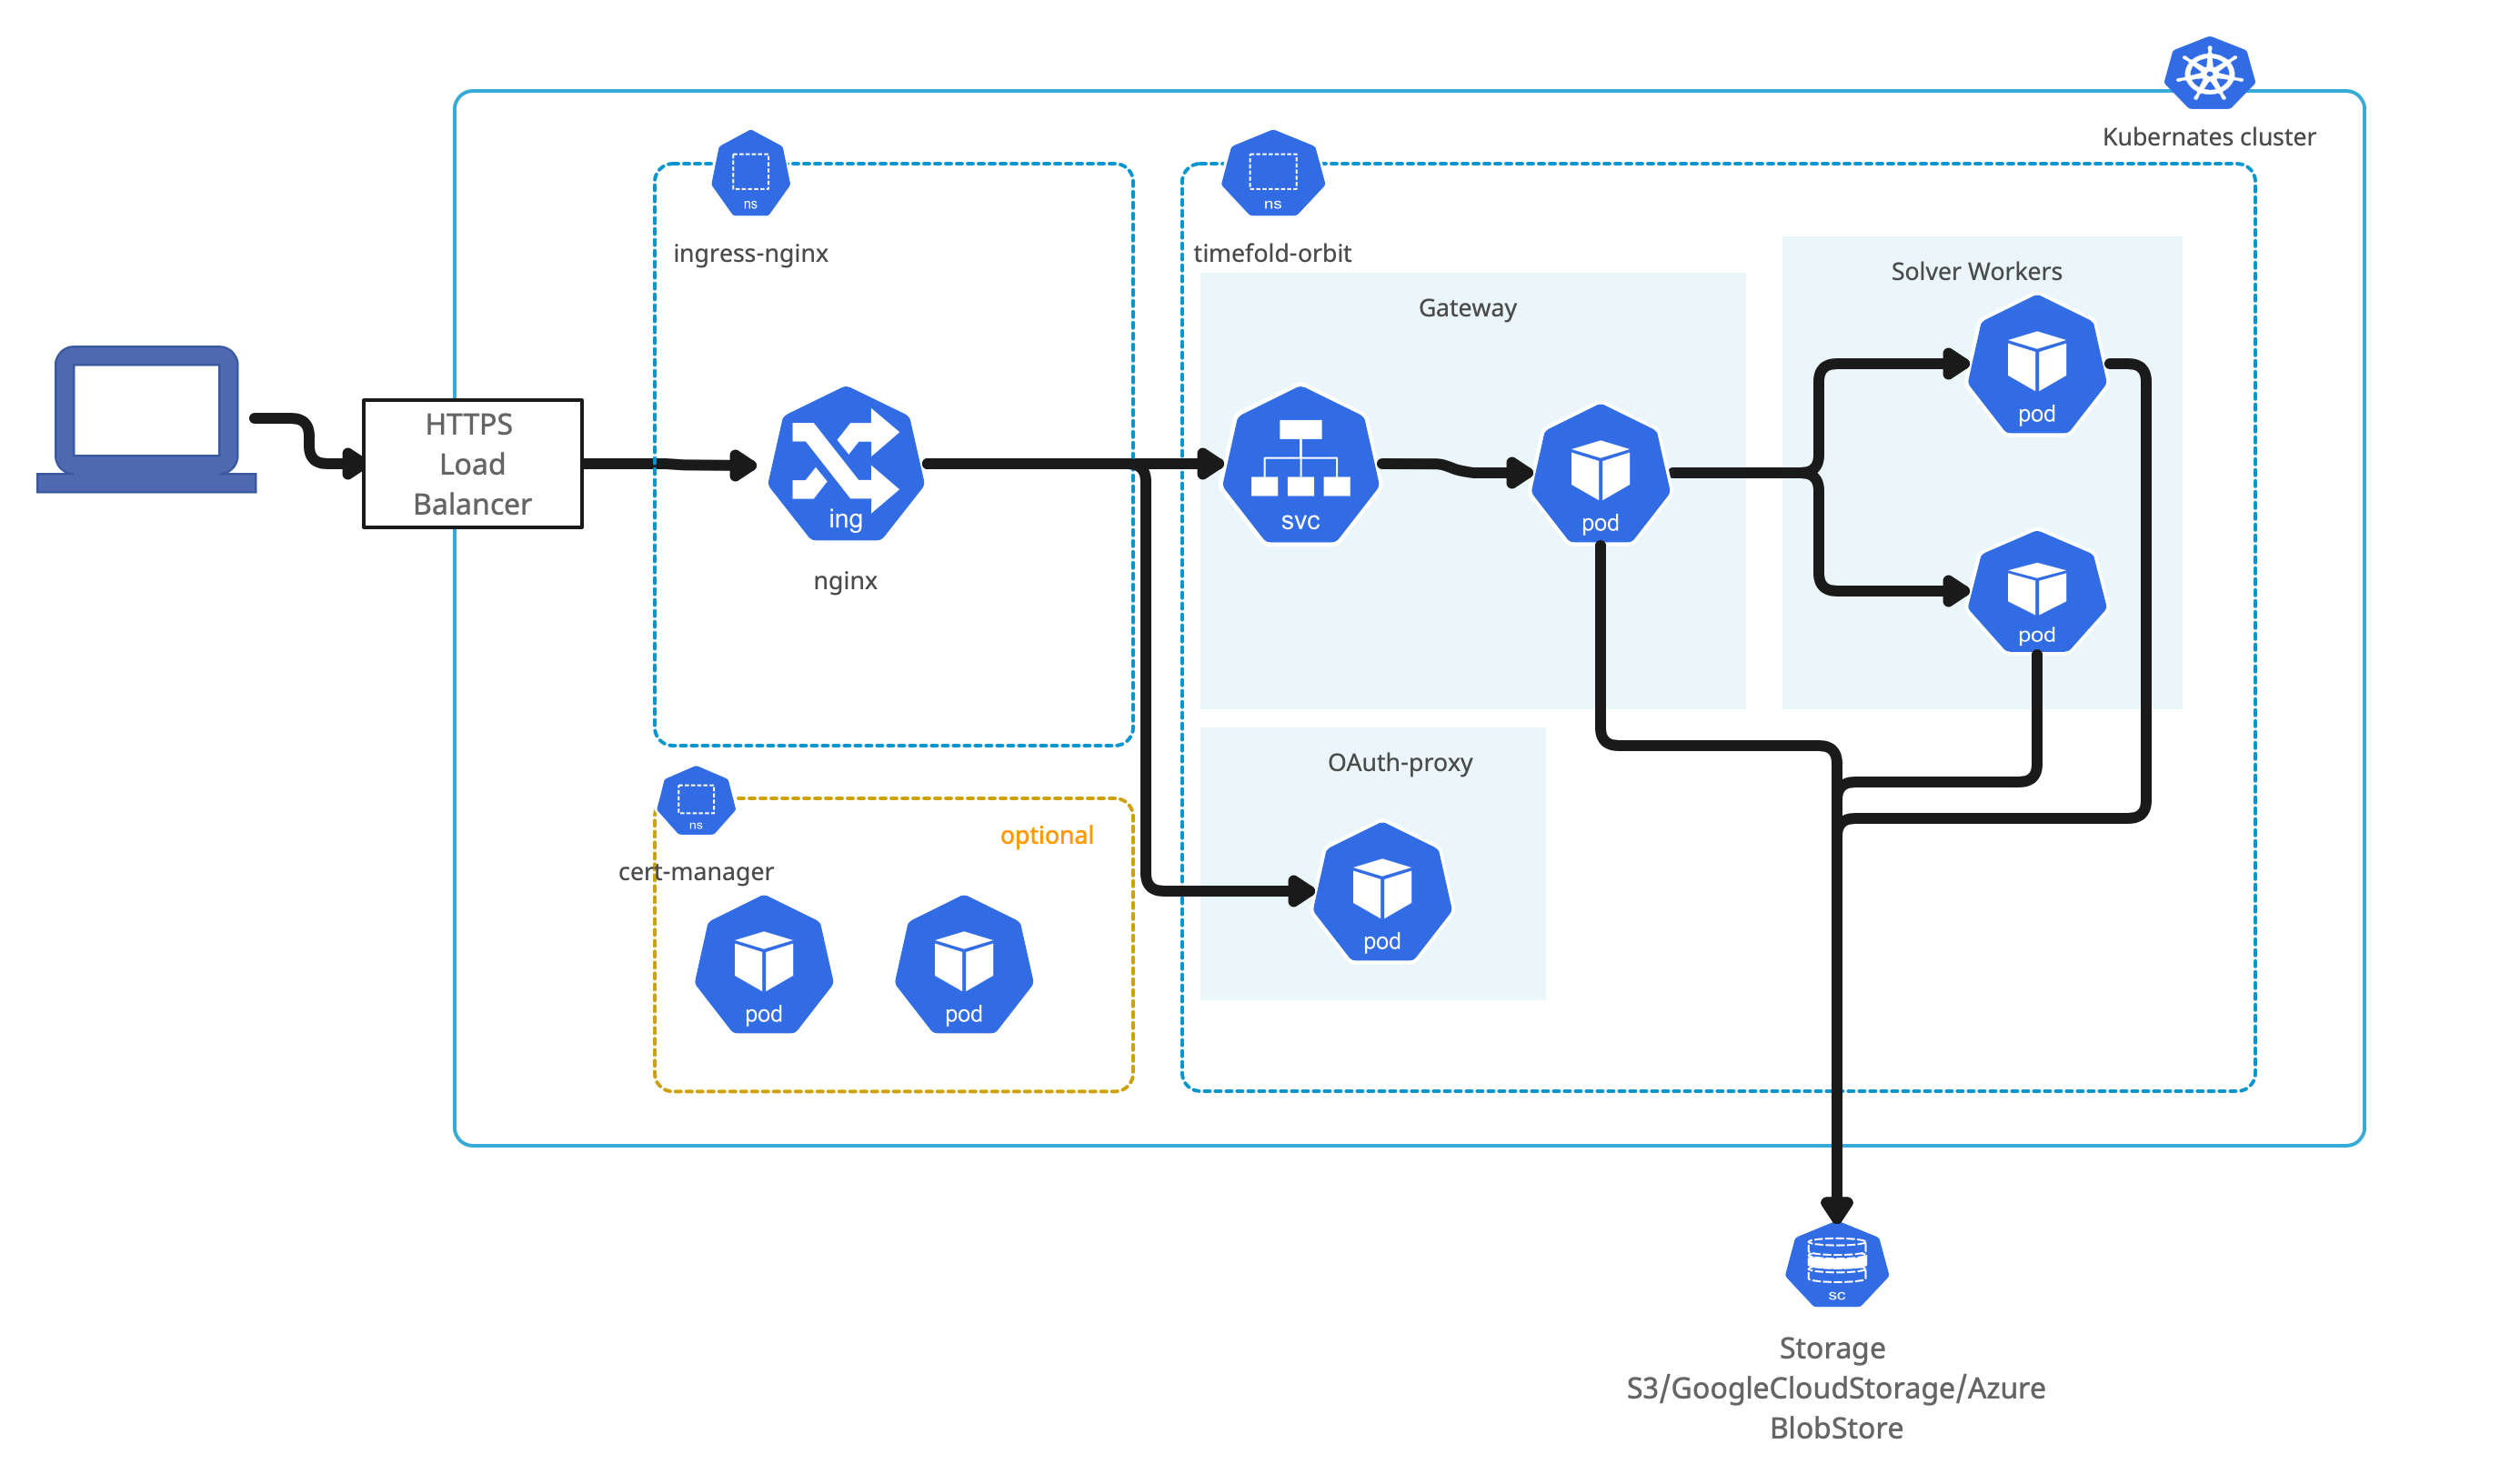
In case of Timefold Orbit with maps integration deployment architecture is as follows

Before you begin
You need to fulfill several prerequisites before proceeding with installation.
-
Kubernetes cluster
-
DNS name with TLS certificate for Timefold Orbit
-
Open ID Connect application
-
Remote data store
-
Required tools installed
Kubernetes
Kubernetes cluster can be either hosted by one of certified cloud providers (see above) or on prem installation.
Amazon EKS Kubernetes cluster installation
Follow these steps to configure basic setup for AWS EKS to have running kubernetes cluster in AWS
Azure Kubernetes cluster installation
Follow these steps to configure basic setup for Azure AKS to have running kubernetes cluster in Azure
Google Kubernetes cluster installation
Follow these steps to configure basic setup for GKE to have running kubernetes cluster in Google Cloud Platform
| Currently AutoPilot version of Google Kubernetes Engine cannot be used with cert manager. When using auto pilot, you need to provide TLS certificate manually. |
Your actions
-
Create Kubernetes cluster
DNS name and certificates
The Timefold Orbit platform is accessible via web interface, this web interface requires a dedicated DNS name and TLS certificates for it.
DNS name should be dedicated to the Timefold Orbit platform e.g. orbit.organization.com.
TLS certificate can be
-
provided as pair of
-
certificate
-
private key used to sing the certificate
-
-
automatically managed certificate life cycle by using
cert-managerand Let’s Encrypt Certificate Authority.
Your actions
-
Create DNS name within your DNS provider
-
If not using cert manager create certificate and private key
OpenID Connect configuration
Security of the Timefold Orbit platform is based on OpenID Connect. This allows to integrate with any OpenID Connect provider such as Google, Azure, Okta and others.
Installation requires following information from an OpenID Connect provider configuration
-
client id (aka application id)
-
client secret
In addition, following information are required that usually come from OpenID Connect configuration encpoint (.well-known/openid-configuration)
-
issuer url - represented as
issuerin OpenID Connect configuration -
certificates url - represented as
jwks_uriin OpenID Connect configuration
|
OIDC configuration endpoints examples: |
Create an application in selected Open ID Connect provider. As a reference, look at Google and Azure client application setup.
Your actions
-
Create Client application in your OpenID Connect provider
-
Make a note of
-
client id
-
client secret
-
Remote data store
The Timefold Orbit platform requires remote data store to persists data sets during execution. Following are supported data stores
-
Amazon S3
-
Google Cloud Storage
-
Azure BlobStore
| Timefold Orbit platform manages data store by creating and removing both objects and their containers/buckets thus the access must be granted for these operations. |
Your actions
-
Create data store in one of the supported options
-
Obtain access key to the created data store
-
service account key for Google Cloud Storage
-
connection string for Azure BlobStore
-
access key and access secret for Amazon S3
-
Installation
Installation of the Timefold Orbit platform consists of three parts
-
Infrastructure installation
-
Security configuration and installation
-
Timefold Orbit deployment
Infrastructure installation
-
Ingress
Core infrastructure component is an ingress that is based on Nginx and acts like an entry point from outside of the Kubernetes cluster. Installation is based on official documentation.
If kubernetes cluster has already Nginx Ingress this step can be ommited. The easiest way to install nginx ingress is via Helm. Issue following command to install ingress in dedicated
ingress-nginxnamespace:helm upgrade --install ingress-nginx ingress-nginx \ --repo https://kubernetes.github.io/ingress-nginx \ --namespace ingress-nginx --create-namespace \ --set controller.allowSnippetAnnotations=trueThe above command is the most basic configuration of the ingress and it is recommended to consult the official documenation when installing to given kubernetes cluster especially when running on cloud provider’s infrastructure. -
Assing ingress external IP to dedicated DNS name
Regardless if the ingress was just installed or it was already present, the external IP of the ingress needs to be assigned to the DNS name for the Timefold Orbit Platform
Issue following command to obtain external IP of the ingress
kubectl get service -n ingress-nginxthe result of the command should be as follows
NAME                                 TYPE           CLUSTER-IP    EXTERNAL-IP     PORT(S)                      AGE
ingress-nginx-controller             LoadBalancer   10.0.79.218   20.31.236.247   80:30723/TCP,443:32612/TCP   5d20h
ingress-nginx-controller-admission   ClusterIP      10.0.214.62   <none>          443/TCP                      5d20h
Make a note of the external ip of the
ingress-nginx-controller. This IP needs to be added as DNS record (A or CNAME) within your DNS provider.
| Verify that host name is properly linked to the ingress external IP and ingress is responding before proceeding with further installation steps |
| At this point, when you access the external IP it should return 404. |
Security configuration and installation
Configuration of security aspect of the platform covers TLS certificate that will be used to secure traffic coming into the platform.
TLS certificate can be provided manually or can be fully managed using cert manager.
| In case certificate is provided manually, the administrator of the platform is responsible for renewal process of the certificate. |
Provide certificate and private key manually
If certificate and private key is provided manually it needs to be set as base64 encoded content in values file (details about values file are described in Timefold Orbit deployment section).
In addition cert manager needs to be disabled (ingress.tls.certManager.enabled set to false)
ingress:
  tls:
    certManager:
      enabled: false
    cert: |
        -----BEGIN CERTIFICATE-----
        MIIFAjCCA+qgAwIBAgISA47J5bfwCEBxdp/Npea0B/isMA0GCSqGSIb3DQEBCwUA
        ....
        -----END CERTIFICATE-----
    key: |
        -----BEGIN RSA PRIVATE KEY-----
        MIIEowIBAAKCAQEAvMx3Yui4OovRQeMnqVHaxmaDSD+hFezqq/mfz2xI6L0dlLfO
        ....
        -----END RSA PRIVATE KEY-----
Cert Manager
| If you provide certificate and private key this step can be ommited. |
Cert manager is responsible for providing trusted certificates for ingress. It takes care of the complete life cycle management for TLS certificate for Timefold Orbit platform. By default when cert manager is enabled, Timefold Orbit will use Let’s Encrypt CA to automatically request and provision TLS certificate for the DNS name.
Installation is based on official documentation.
| If kubernetes cluster has already Cert Manager this step can be ommited. |
The easiest way to install cert-manger is via Helm. Issue following commands to install it in dedicated cert-manager namespace:
helm repo add jetstack https://charts.jetstack.io
helm install cert-manager jetstack/cert-manager \
  --namespace cert-manager \
  --version v1.13.2 \
  --create-namespace \
  --set installCRDs=true
At this point, the cert-manager should be installed. When running the following command
kubectl get service --namespace cert-manager cert-manager
the result of the command should be as follows
NAME           TYPE        CLUSTER-IP   EXTERNAL-IP   PORT(S)    AGE
cert-manager   ClusterIP   10.0.254.7   <none>        9402/TCP   105s
Once cert manager is installed, deployment of Timefold Orbit platform will create Let’s Encrypt based issuer automatically. If there is a need to use another issuer, follow cert manager guide on creating issuer.
Prepare Kubernetes cluster
Kubernetes cluster runs workloads on worker nodes. These worker nodes are actually machines attached to the cluster that have certain characteristics such as CPU type and architecture, available memory and so on. Timefold Orbit workload is compute intense and runs best on compute optimized nodes.
Type of nodes is very dependent on where Kubernetes cluster is running and what type of hardware is available.
By default Timefold Orbit runs on any nodes available in the cluster so no additional configuration is required but it is recommended to dedicate compute optimized node in the cluster for running solver workloads.
List all available nodes in you cluster with following command:
kubectl get nodesMark selected worker nodes as solver workers
Use following command to mark selected nodes as dedicated for running solver workloads
kubectl taint nodes NAME_OF_THE_NODE ai.timefold/solver-worker=true:NoSchedule
kubectl label nodes NAME_OF_THE_NODE ai.timefold/solver-worker=true| The commands should be executed on every node that should be dedicated to run solver workloads |
After marking nodes as solver workers only solving pods will be able to run on these nodes.
| Ensure that there are some nodes available that are not dedicated to solver workloads to allow to execute any other type of workloads. |
Dedicate selected worker nodes to given model
If Timefold Orbit is configured with multiple models, there is an option to dedicate selected nodes for given models by the model id.
Use following command to mark selected nodes as dedicated for running employee-scheduling model only
kubectl taint nodes NAME_OF_THE_NODE ai.timefold/model=employee-scheduling:NoSchedule
kubectl label nodes NAME_OF_THE_NODE ai.timefold/model=employee-scheduling| The commands should be executed on every node that should be dedicated to run solver workloads |
Dedicate selected worker nodes to given tenant
When Timefold Orbit runs in multi tenant setup, there is also an option to dedicate selected nodes to given tenant.
Use following command to mark selected nodes as dedicated for running 668798f6-2026-4cce-9098-e212730b060e tenant (given as id) only
kubectl taint nodes NAME_OF_THE_NODE ai.timefold/tenant=668798f6-2026-4cce-9098-e212730b060e:NoSchedule
kubectl label nodes NAME_OF_THE_NODE ai.timefold/tenant=668798f6-2026-4cce-9098-e212730b060e| The commands should be executed on every node that should be dedicated to run solver workloads |
Timefold Orbit deployment
Timefold support provides an access token to container registry. This access token is then used during installation and by the running components.
Generate token value to access container registry
Use following command to create a base64 encoded string that will act as container registry token used in the installation of the Timefold Orbit platform.
kubectl create secret docker-registry timefold-ghcr --docker-server=ghcr.io --docker-username=sa --docker-password={YOUR_TIMEFOLD_TOKEN} --dry-run=client --output="jsonpath={.data.\.dockerconfigjson}"replace YOUR_TIMEFOLD_TOKEN with the token received from Timefold support
Once installation is completed, you can access the plaform on dedicated DNS name.
Once the token is created, set it as environment variable TOKEN.
export TOKEN=VALUE_FROM_PREVIOUS_STEPThe Timefold Orbit platform deployment differs in terms of configuration options depending on remote data store selected.
Amazon S3 based installation
-
Save following template as
orbit-values.yaml
#####
##### Installation values for Amazon Web Services (EKS) based environment
#####

license: YOUR_ORBIT_LICENSE

ingress:
  host: YOUR_HOST_NAME
  tls:
    # select one of the below options
    # 1) in case cert manager is not available or cannot be used, provide certificate and private key
    #cert:
    #key:
    # 2) if cert manager is installed and lets encrypt can be used
    certManager:
      enabled: true
      issuer: "letsencrypt-prod"
      acmeEmail: YOUR_ADMINISTRATOR_EMAIL_ADDRESS

oauth:
  certs: YOUR_OIDC_PROVIDER_CERTS_URL
  issuer: YOUR_OIDC_PROVIDER_ISSUER_URL
  emailDomain: YOUR_ORG_EMAIL_DOMAIN
  clientId: YOUR_CLIENT_ID
  # generated cookie secret with following command
  # dd if=/dev/urandom bs=32 count=1 2>/dev/null | base64 | tr -d -- '\n' | tr -- '+/' '-_'; echo
  cookieSecret: YOUR_COOKIE_SECRET

secrets:
  data:
    awsAccessKey: YOUR_AWS_ACCESS_KEY
    awsAccessSecret: YOUR_AWS_ACCESS_SECRET

# administrators of the platform
admins: |
#  [email protected]


storage:
  remote:
    # specify custom name for configuration bucket, can be company name with timefold-configuration suffix or domain name
    name: YOUR_CUSTOM_NAME_FOR_CONFIG_BUCKET
    # specify retention of data in the platform expressed in days, data will be automatically removed
    #expiration: 7
    type: s3
    #s3:
    #  region: us-east-1


#models:
  # maximum amount of time solver will spend before termination
#  terminationSpentLimit: PT30M
  # maximum allowed limit for user-supplied termination spentLimit. Safety net to prevent long-running jobs
#  terminationMaximumSpentLimit: PT60M
  # if the score has not improved during this period, terminate the solver
#  terminationUnimprovedSpentLimit: PT5M
  # maximum allowed limit for user-supplied termination unimprovedSpentLimit. Safety net to prevent long-running jobs
#  terminationMaximumUnimprovedSpentLimit: PT5M
   # duration to keep the runtime after solving has finished
#  runtimeTimeToLive: PT1M
   # duration to keep the runtime without solving since last request
#  idleRuntimeTimeToLive: PT30M
   # IMPORTANT: when setting resources, all must be set
#  resources:
#    limits:
      # max CPU allowed for the platform to be used
#      cpu: 1
      # max memory allowed for the platform to be used
#      memory: 512Mi
#    requests:
      # guaranteed CPU for the platform to be used
#     cpu: 1
      # guaranteed memory for the platform to be used
#      memory: 512Mi
#  runOn:
    # will only run on nodes that are marked as solver workers
#    solverWorkers: false
    # will only run on nodes that are marked with model id
#    modelDedicated: false
    # will only run on nodes that are marked with tenant id
#    tenantDedicated: false

#maps:
#  enabled: true
#  cache:
#    TTL: P7D
#    cleaningInterval: PT1H
#    persistentVolume:
#      storageClassName: "gp2"
#      accessMode: "ReadWriteOnce"
#      size: "8Gi"
#  osrm:
#    options: "--max-table-size 10000"
#    locations:
#      - region: us-southern-california
#        maxLocationsInRequest: 10000
#      - region: us-georgia
#        maxLocationsInRequest: 10000
#    retry:
#      maxDurationMinutes: 60
#    autoscaling:
#      enabled: true
#      minReplicas: 1
#      maxReplicas: 2
#      cpuAverageUtilization: 110
The above file serves as template for S3 based deployment of Timefold Orbit platform.
Replace all parameters that start with YOUR_ with the corresponding values
-
YOUR_HOST_NAME- DNS name dedicated to Timefold orbit -
YOUR_OIDC_PROVIDER_CERTS_URLOIDC certificates URL from OIDC provider -
YOUR_OIDC_PROVIDER_ISSUER_URLOIDC issuer URL from OIDC provider -
YOUR_ORG_EMAIL_DOMAINdomain of the email address that are allowed to access the platform, remove this parameter or set to*to allow any email domains -
YOUR_CLIENT_IDapplication client id from OIDC provider -
YOUR_COOKIE_SECRETgenerated secret to encrypt cookies - see command next to the property in the template -
YOUR_CUSTOM_NAME_FOR_CONFIG_BUCKETspecify unique name for the bucket that configuration should be stored in. S3 bucket names must be globally unique so ideal is to use company name or domain name as bucket name.
when using cert manager:
- YOUR_ADMINISTRATOR_EMAIL_ADDRESS - email address or functional mail box to be notified about certificate issues managed by cert manager
when not using cert manager:
- set ingress.tls.certManager.enabled to false
- remove other settings about cert manager (under ingress.tls.certManager)
- uncomment and set values for ingress.tls.cert and ingress.tls.key
Optionally platform administrators can be set by setting email addresses of the users as a list of admins property
If you marked kubernetes worker nodes as dedicated to solver workload, model or tenant, uncomment in your orbit-values.yaml file corresponding entries under models → runOn section
|
This file can be safely stored as it does not contain any sensitive information. Such information are provided as part of installation command from environment variables.
Login to Timefold Helm Chart repository to gain access to Timefold Orbit chart. Use user as username and token provided by Timefold support as password.
helm registry login ghcr.io/timefoldaiInstallation command requires following environment variables to be set:
-
NAMESPACE - kubernetes namespace where platform should be installed
-
OAUTH_CLIENT_SECRET - client secret of the application used for this environment
-
TOKEN - GitHub access token to container registry provided by Timefold support
-
LICENSE - Timefold Orbit license string provided by Timefold support
-
AWS_ACCESS_KEY - AWS access key
-
AWS_ACCESS_SECRET - AWS access secret
Once successfully logged in with environment variables set, issue installation command via helm:
helm upgrade --install --atomic --namespace $NAMESPACE timefold-orbit oci://ghcr.io/timefoldai/timefold-orbit-platform  \
        -f orbit-values.yaml \
        --create-namespace \
        --set namespace=$NAMESPACE \
        --set oauth.clientSecret="$OAUTH_CLIENT_SECRET" \
        --set image.registry.auth="$TOKEN" \
        --set license="$LICENSE" \
        --set secrets.data.awsAccessKey="$AWS_ACCESS_KEY" \
        --set secrets.data.awsAccessSecret="$AWS_ACCESS_SECRET"
Above command will install (or upgrade) latest released version of the Timefold Orbit platform. To install specific version append --version A.B.C to the command where A.B.C is the version number to be used.
|
Once installation is completed, you can access the platform on dedicated DNS name. Information how to access will be displayed at the end of installation.
Google Cloud Storage based installation
-
Save following template as
orbit-values.yaml
#####
##### Installation values for Google Cloud Platform (GKE) based environment
#####

license: YOUR_ORBIT_LICENSE

ingress:
  host: YOUR_HOST_NAME
  tls:
    # select one of the below options
    # 1) in case cert manager is not available or cannot be used, provide certificate and private key
    #cert:
    #key:
    # 2) if cert manager is installed and lets encrypt can be used
    certManager:
      enabled: true
      issuer: "letsencrypt-prod"
      acmeEmail: YOUR_ADMINISTRATOR_EMAIL_ADDRESS

oauth:
  certs: YOUR_OIDC_PROVIDER_CERTS_URL
  issuer: YOUR_OIDC_PROVIDER_ISSUER_URL
  emailDomain: YOUR_ORG_EMAIL_DOMAIN
  clientId: YOUR_CLIENT_ID
  # generated cookie secret with following command
  # dd if=/dev/urandom bs=32 count=1 2>/dev/null | base64 | tr -d -- '\n' | tr -- '+/' '-_'; echo
  cookieSecret: YOUR_COOKIE_SECRET

secrets:
  stringData:
    serviceAccountKey: YOUR_GOOGLE_STORAGE_SERVICE_ACCOUNT_KEY
    projectId: YOUR_GOOGLE_CLOUD_PROJECT_ID

# administrators of the platform
admins: |
#  [email protected]


storage:
  remote:
    # specify custom name for configuration bucket, can be google project id with timefold-configuration suffix or domain name
    name: YOUR_CUSTOM_NAME_FOR_CONFIG_BUCKET
    # specify retention of data in the platform expressed in days, data will be automatically removed
    #expiration: 7
    type: gcs

#models:
  # maximum amount of time solver will spend before termination
#  terminationSpentLimit: PT30M
  # maximum allowed limit for user-supplied termination spentLimit. Safety net to prevent long-running jobs
#  terminationMaximumSpentLimit: PT60M
  # if the score has not improved during this period, terminate the solver
#  terminationUnimprovedSpentLimit: PT5M
  # maximum allowed limit for user-supplied termination unimprovedSpentLimit. Safety net to prevent long-running jobs
#  terminationMaximumUnimprovedSpentLimit: PT5M
   # duration to keep the runtime after solving has finished
#  runtimeTimeToLive: PT1M
   # duration to keep the runtime without solving since last request
#  idleRuntimeTimeToLive: PT30M
   # IMPORTANT: when setting resources, all must be set
#  resources:
#    limits:
      # max CPU allowed for the platform to be used
#      cpu: 1
      # max memory allowed for the platform to be used
#      memory: 512Mi
#    requests:
      # guaranteed CPU for the platform to be used
#     cpu: 1
      # guaranteed memory for the platform to be used
#      memory: 512Mi
#  runOn:
    # will only run on nodes that are marked as solver workers
#    solverWorkers: false
    # will only run on nodes that are marked with model id
#    modelDedicated: false
    # will only run on nodes that are marked with tenant id
#    tenantDedicated: false

#maps:
#  enabled: true
#  cache:
#    TTL: P7D
#    cleaningInterval: PT1H
#    persistentVolume:
#      storageClassName: "standard"
#      accessMode: "ReadWriteOnce"
#      size: "8Gi"
#  osrm:
#    options: "--max-table-size 10000"
#    locations:
#      - region: us-southern-california
#        maxLocationsInRequest: 10000
#      - region: us-georgia
#        maxLocationsInRequest: 10000
#    retry:
#      maxDurationMinutes: 60
#    autoscaling:
#      enabled: true
#      minReplicas: 1
#      maxReplicas: 2
#      cpuAverageUtilization: 110
The above file serves as template for Google Cloud Storage based deployment of Timefold Orbit platform.
Replace all parameters that start with YOUR_ with the corresponding values
-
YOUR_HOST_NAME- DNS name dedicated to Timefold orbit -
YOUR_OIDC_PROVIDER_CERTS_URLOIDC certificates URL from OIDC provider -
YOUR_OIDC_PROVIDER_ISSUER_URLOIDC issuer URL from OIDC provider -
YOUR_ORG_EMAIL_DOMAINdomain of the email address that are allowed to access the platform, remove this parameter or set to*to allow any email domains -
YOUR_CLIENT_IDapplication client id from OIDC provider -
YOUR_COOKIE_SECRETgenerated secret to encrypt cookies - see command next to the property in the template -
YOUR_CUSTOM_NAME_FOR_CONFIG_BUCKETspecify unique name for the bucket that configuration should be stored in. Google Cloud Storage bucket names must be globally unique so ideal is to use company name or domain name as bucket name.
when using cert manager:
- YOUR_ADMINISTRATOR_EMAIL_ADDRESS - email address or functional mail box to be notified about certificate issues managed by cert manager
when not using cert manager:
- set ingress.tls.certManager.enabled to false
- remove other settings about cert manager (under ingress.tls.certManager)
- uncomment and set values for ingress.tls.cert and ingress.tls.key
Optionally platform administrators can be set by setting email addresses of the users as a list of admins property
If you marked kubernetes worker nodes as dedicated to solver workload, model or tenant, uncomment in your orbit-values.yaml file corresponding entries under models → runOn section
|
This file can be safely stored as it does not contain any sensitive information. Such information are provided as part of installation command from environment variables.
Login to Timefold Helm Chart repository to gain access to Timefold Orbit chart. Use user as username and token provided by Timefold support as password.
helm registry login ghcr.io/timefoldaiInstallation command requires following environment variables to be set:
-
NAMESPACE - kubernetes namespace where platform should be installed
-
OAUTH_CLIENT_SECRET - client secret of the application used for this environment
-
TOKEN - GitHub access token to container registry provided by Timefold support
-
LICENSE - Timefold Orbit license string provided by Timefold support
-
GCS_SERVICE_ACCOUNT - Service Account key for Google Cloud Storage
-
GCP_PROJECT_ID - Google Cloud Project id where storage is created
Once successfully logged in with environment variables set, issue installation command via helm:
helm upgrade --install --atomic --namespace $NAMESPACE timefold-orbit oci://ghcr.io/timefoldai/timefold-orbit-platform  \
        -f orbit-values.yaml \
        --create-namespace \
        --set namespace=$NAMESPACE \
        --set oauth.clientSecret="$OAUTH_CLIENT_SECRET" \
        --set image.registry.auth="$TOKEN" \
        --set license="$LICENSE" \
        --set secrets.stringData.serviceAccountKey="$GCS_SERVICE_ACCOUNT" \
        --set secrets.stringData.projectId="$GCP_PROJECT_ID"
Above command will install (or upgrade) latest released version of the Timefold Orbit platform. To install specific version append --version A.B.C to the command where A.B.C is the version number to be used.
|
Once installation is completed, you can access the platform on dedicated DNS name.
Azure BlobStore based installation
-
Save following template as
orbit-values.yaml
#####
##### Installation values for Azure (AKS) based environment
#####

license: YOUR_ORBIT_LICENSE

ingress:
  host: YOUR_HOST_NAME
  tls:
    # select one of the below options
    # 1) in case cert manager is not available or cannot be used, provide certificate and private key
    #cert:
    #key:
    # 2) if cert manager is installed and lets encrypt can be used
    certManager:
      enabled: true
      issuer: "letsencrypt-prod"
      acmeEmail: YOUR_ADMINISTRATOR_EMAIL_ADDRESS

oauth:
  certs: YOUR_OIDC_PROVIDER_CERTS_URL
  issuer: YOUR_OIDC_PROVIDER_ISSUER_URL
  emailDomain: YOUR_ORG_EMAIL_DOMAIN
  clientId: YOUR_CLIENT_ID
  # generated cookie secret with following command
  # dd if=/dev/urandom bs=32 count=1 2>/dev/null | base64 | tr -d -- '\n' | tr -- '+/' '-_'; echo
  cookieSecret: YOUR_COOKIE_SECRET

secrets:
  data:
    azureStoreConnectionString: YOUR_AZURE_BLOB_STORE_CONNECTION_STRING

# administrators of the platform
admins: |
#  [email protected]


storage:
  remote:
   # specify custom name for configuration bucket, can be company name with timefold-configuration suffix or domain name
    name: YOUR_CUSTOM_NAME_FOR_CONFIG_BUCKET
    type: azure


#models:
  # maximum amount of time solver will spend before termination
#  terminationSpentLimit: PT30M
  # maximum allowed limit for user-supplied termination spentLimit. Safety net to prevent long-running jobs
#  terminationMaximumSpentLimit: PT60M
  # if the score has not improved during this period, terminate the solver
#  terminationUnimprovedSpentLimit: PT5M
  # maximum allowed limit for user-supplied termination unimprovedSpentLimit. Safety net to prevent long-running jobs
#  terminationMaximumUnimprovedSpentLimit: PT5M
# duration to keep the runtime after solving has finished
#  runtimeTimeToLive: PT1M
   # duration to keep the runtime without solving since last request
#  idleRuntimeTimeToLive: PT30M
   # IMPORTANT: when setting resources, all must be set
#  resources:
#    limits:
      # max CPU allowed for the platform to be used
#      cpu: 1
      # max memory allowed for the platform to be used
#      memory: 512Mi
#    requests:
      # guaranteed CPU for the platform to be used
#     cpu: 1
      # guaranteed memory for the platform to be used
#      memory: 512Mi
#  runOn:
    # will only run on nodes that are marked as solver workers
#    solverWorkers: false
    # will only run on nodes that are marked with model id
#    modelDedicated: false
    # will only run on nodes that are marked with tenant id
#    tenantDedicated: false

#maps:
#  enabled: true
#  cache:
#    TTL: P7D
#    cleaningInterval: PT1H
#    persistentVolume:
#      storageClassName: "Standard_LRS"
#      accessMode: "ReadWriteOnce"
#      size: "8Gi"
#  osrm:
#    options: "--max-table-size 10000"
#    locations:
#      - region: us-southern-california
#        maxLocationsInRequest: 10000
#      - region: us-georgia
#        maxLocationsInRequest: 10000
#    retry:
#      maxDurationMinutes: 60
#    autoscaling:
#      enabled: true
#      minReplicas: 1
#      maxReplicas: 2
#      cpuAverageUtilization: 110
The above file serves as template for Azure BlobStore based deployment of Timefold Orbit platform.
Replace all parameters that start with YOUR_ with the corresponding values
-
YOUR_HOST_NAME- DNS name dedicated to Timefold orbit -
YOUR_OIDC_PROVIDER_CERTS_URLOIDC certificates URL from OIDC provider -
YOUR_OIDC_PROVIDER_ISSUER_URLOIDC issuer URL from OIDC provider -
YOUR_ORG_EMAIL_DOMAINdomain of the email address that are allowed to access the platform, remove this parameter or set to*to allow any email domains -
YOUR_CLIENT_IDapplication client id from OIDC provider -
YOUR_COOKIE_SECRETgenerated secret to encrypt cookies - see command next to the property in the template -
YOUR_CUSTOM_NAME_FOR_CONFIG_BUCKETspecify unique name for the container within storage account that configuration should be stored in. Azure containers names does not have to be globally unique but it is recommended to use company name or domain name as container name.
when using cert manager:
- YOUR_ADMINISTRATOR_EMAIL_ADDRESS - email address or functional mail box to be notified about certificate issues managed by cert manager
when not using cert manager:
- set ingress.tls.certManager.enabled to false
- remove other settings about cert manager (under ingress.tls.certManager)
- uncomment and set values for ingress.tls.cert and ingress.tls.key
Optionally platform administrators can be set by setting email addresses of the users as a list of admins property
If you marked kubernetes worker nodes as dedicated to solver workload, model or tenant, uncomment in your orbit-values.yaml file corresponding entries under models → runOn section
|
This file can be safely stored as it does not contain any sensitive information. Such information are provided as part of installation command from environment variables.
Login to Timefold Helm Chart repository to gain access to Timefold Orbit chart. Use user as username and token provided by Timefold support as password.
helm registry login ghcr.io/timefoldaiInstallation command requires following environment variables to be set:
-
NAMESPACE - kubernetes namespace where platform should be installed
-
OAUTH_CLIENT_SECRET - client secret of the application used for this environment
-
TOKEN - GitHub access token to container registry provided by Timefold support
-
LICENSE - Timefold Orbit license string provided by Timefold support
-
AZ_CONNECTION_STRING - Azure BlobStore connection string
Once successfully logged in with environment variables set, issue installation command via helm:
helm upgrade --install --atomic --namespace $NAMESPACE timefold-orbit oci://ghcr.io/timefoldai/timefold-orbit-platform  \
        -f orbit-values.yaml \
        --create-namespace \
        --set namespace=$NAMESPACE \
        --set oauth.clientSecret="$OAUTH_CLIENT_SECRET" \
        --set image.registry.auth="$TOKEN" \
        --set license="$LICENSE" \
        --set secrets.data.azureStoreConnectionString="$AZ_CONNECTION_STRING"
Above command will install (or upgrade) latest released version of the Timefold Orbit platform. To install specific version append --version A.B.C to the command where A.B.C is the version number to be used.
|
Once installation is completed, you can access the platform on dedicated DNS name.
Deploy maps integration
The Timefold Orbit platform provides integration with maps to provide more accurate travel time and distance calculation. This map component is deployed as part of the Timefold Orbit platform but must be explicitly turned on and maps regions specified.
Enable maps in your orbit-values.yaml file with following sections
maps:
  enabled: true
  cache:
    TTL: P7D
    cleaningInterval: PT1H
    persistentVolume: # Optional
      accessMode: "ReadWriteOnce"
      size: "8Gi"
      #storageClassName: "standard" #Specific to each provider storage
  osrm:
    options: "--max-table-size 10000"
    locations:
      - region: osrm-britain-and-ireland
#        maxLocationsInRequest: 10000 # Maximum number of accepted locations for OSRM requests. Defaults to 10000.
#        resources:
#          requests:
#            memory: "1000M" # Optional, defaults to the idle memory of the specific image.
#            cpu: "1000m" # Optional, defaults to 1000m.
#          limits:
#            memory: "8000M" # Optional, defaults to empty.
#            cpu: "5000m" # Optional, defaults to empty.
#    retry:
#      maxDurationMinutes: 60 # Set timeout of retry requests to OSRM in minutes. Defaults to 60.
#    autoscaling:
#      enabled: true # Enables OSRM instance autoscaling. This works by scaling the map for each location independently. Defaults to false.
#      minReplicas: 1 # Minimum number of OSRM instance replicas. Defaults to 1.
#      maxReplicas: 2 # Maximum number of OSRM instance replicas. Defaults to 2.
#      cpuAverageUtilization: 110 # Memory cpu utilization to scale OSRM instance. It can be fine-tuned based on expected usage of OSRM maps. Defaults to 110.
Next, configure the map to be used for the model with following configuration
models:
  mapService:
    fieldServiceRouting: osrm-britain-and-ireland
Above configuration provisions the complete set of components to use map as source for distance and travel time for solving. Below is a detailed description of some configurations used by the maps.
Cache
The cache in the map service caches distance matrices by location set names. When a distance request is received with a location set name parameter, the distance matrix is stored in the cache and it will be kept for an amount of time defined in the TTL parameter. When performing subsequent requests with the same location set name, independently of the list of locations sent, the map service will return the cached distance matrix.
It’s also possible to precalculate a location set using the location sets management API. In that case, the distance matrix is stored without expiring, and it’s only removed after an explicit deletion using the API.
Persistent Volume
If persistentVolume is not set, it will be used the storage from each node for the maps cache. In that case, the cache will be cleared when the pod restarts. It’s possible to set the storageClassName for the specific storage of each provider (e.g. "standard" for GCP, "gp2" for AWS and "Standard_LRS" for Azure).
Autoscaling
If OSRM autoscaling is enabled, it’s also needed to have the Metrics Server in you cluster. On some deployments it’s installed by default. If it’s not already installed, you can install it with the following command (more information in the helm chart):
helm repo add bitnami https://charts.bitnami.com/bitnami &&
helm repo update &&
helm upgrade --install --atomic --timeout 120s metrics-server bitnami/metrics-server --namespace "metrics-server" --create-namespace
The OSRM autoscaling works by scaling the map for each location independently. It will aim for an average utilization of each instance of 70% of the memory.
Maps officially supported by Timefold
Map image containers are built by Timefold for given region and provided to users via Timefold container registry (ghcr.io/timefoldai). Please contact Timefold support in case given region is not yet available
|
Below table specifies what maps are currently supported and available for Orbit platform.
| Name, header row | Based on map, header row |
|---|---|
uk |
http://download.geofabrik.de/europe/united-kingdom-latest.osm.pbf |
greater-london |
http://download.geofabrik.de/europe/united-kingdom/england/greater-london-latest.osm.pbf |
britain-and-ireland |
http://download.geofabrik.de/europe/britain-and-ireland-latest.osm.pbf |
us-georgia |
http://download.geofabrik.de/north-america/us/georgia-latest.osm.pbf |
us-southern-california |
http://download.geofabrik.de/north-america/us/california/socal-latest.osm.pbf |
belgium |
|
australia |
http://download.geofabrik.de/australia-oceania/australia-latest.osm.pbf |
dach |
|
india |
|
gcc-states |
|
ontario |
http://download.geofabrik.de/north-america/canada/ontario-latest.osm.pbf |
Map instances hardware requirements
Some maps can have demanding hardware requirements. Because each map has a different sizing, it can be hard to define the resources needed for a map instance.
Memory Requirements
The memory of a map instance can be calculated by the sum of the memory of the map when idle (the memory it needs to start without doing any calculation) and the memory it uses to answer the requests at a given point in time.
\$"MaxMemMap" = "MemMapIdle" + max("MemUsedForRequests")\$
For the map memory when idle, the values are as follows:
| Region | Idle Memory (MB) |
|---|---|
uk |
3000 |
greater-london |
170 |
britain-and-ireland |
3720 |
us-georgia |
1080 |
us-southern-california |
1420 |
belgium |
540 |
australia |
1550 |
dach |
6848 |
india |
10500 |
gcc-states |
1266 |
ontario |
736 |
The memory used for requests varies according to the number of locations requested and the number of simultaneous requests.
The table below expresses the approximated memory used per request depending on the number of locations:
| Number of locations | Memory used (MB) |
|---|---|
From 0 to 100 |
0 |
From 100 to 200 |
10 |
From 200 to 600 |
40 |
From 600 to 1100 |
200 |
From 1100 to 2000 |
500 |
From 2000 to 4000 |
2000 |
From 4000 to 6000 |
4300 |
From 6000 to 8000 |
7600 |
From 8000 to 10000 |
12000 |
From 10000 to 12000 |
17000 |
From 12000 to 14000 |
23000 |
From 14000 to 16000 |
30000 |
From 16000 to 18000 |
38000 |
From 18000 to 20000 |
47000 |
Currently, our maps do not support requests with more than 20 000 locations. The maximum configured number of locations
is set to 10 000 by default, but can be increased (up to 20 000) using the parameter maxLocationsInRequest when configuring each map.
If simultaneous requests are made to the maps instances and there is not enough memory to calculate them,
they will be queued internally until there is memory available for them to be calculated or until they timeout
(timeout can be set in the parameter maps.osrm.retry.maxDurationMinutes).
CPU Requirements
The map instances use one core per request.
It’s possible to enable autoscaling of maps instances based on the percentage of CPU used by the instances,
using the properties defined in maps.osrm.autoscaling (for details read Deploy maps integration section).
Maps Location Sets configuration
To avoid having to recalculate the distance matrix for the same locations, it’s possible to configure the precalculation of a location set. A location set is identified by its name and can be used by the models to avoid the calculation of an already cached distance matrix.
It’s possible to precalculate and cache a location set using the Location Sets Management API.
The API is available at /api/admin/v1/tenants/{tenantId}/maps/location-sets, and it allows a user to configure location sets for a tenant.
Each location set, besides the name and the list of locations, must also be configured with a region (the region of the map used, eg. osrm-britain-and-ireland)
and a map provider (eg. osrm), so that it’s possible to create location sets for different regions and providers.
curl --location '{TIMEFOLD_PLATFORM_URL}/api/admin/v1/tenants/{TENANT_ID}/maps/location-sets' \
--header 'Content-Type: application/json' \
--header 'Authorization: Bearer {TOKEN}' \
--data '{
  "name": "location-set-name",
  "locations": [
    [
      40.5044403760272,
      -76.37894009358867
    ],
    [
      41.5044403760272,
      -75.37894009358867
    ]
  ],
  "region": "{MAP_REGION}",
  "provider": "{MAP_PROVIDER}"
}'
After the creation of a location set, its status will be PROCESSING. After the matrix is calculated, the location set can be in one of two states: COMPLETED or FAILED.
If the status is COMPLETED, the distance matrix of the location set was successfully calculated and cached.
Otherwise, when the status is FAILED, the distance matrix was not stored in the cache.
curl --location '{TIMEFOLD_PLATFORM_URL}/api/admin/v1/tenants/{TENANT_ID}/maps/location-sets/location-set-name' \
--header 'Content-Type: application/json' \
--header 'Authorization: Bearer {TOKEN}'
{
"name": "location-set-name",
"locations": [
[
40.5044403760272,
-76.37894009358867
],
[
41.5044403760272,
-75.37894009358867
]
],
"region": "{MAP_REGION}",
"provider": "{MAP_PROVIDER}",
"status": "COMPLETED"
}When the location set is deleted, the distance matrix is also deleted and removed from the cache.
curl --location --request DELETE '{TIMEFOLD_PLATFORM_URL}/api/admin/v1/tenants/{TENANT_ID}/maps/location-sets/location-set-name' \
--header 'Content-Type: application/json' \
--header 'Authorization: Bearer {TOKEN}' \
It’s also possible to add a list of locations to a location set, using the PATCH operation. In this case the new locations will be added at the end of the location set.
curl --location --request PATCH '{TIMEFOLD_PLATFORM_URL}/api/admin/v1/tenants/{TENANT_ID}/maps/location-sets/location-set-name' \
--header 'Content-Type: application/json' \
--header 'Authorization: Bearer {TOKEN}' \
--data '[
  [
    43.5044403760272,
    -76.37894009358867
  ]
]'| In a location set, the order of locations is important, as it must be the order in which they appear in the model. |
All requests to the Location Sets Management API require a bearer token based on the oauth2 platform configuration.
For example, for the field-service-routing model, one can configure a location setting the field LocationSetName of the modelInput with the name of the location set.
{
  "modelInput": {
    "locationSetName": "location-set-name",
    ...
  },
  ...
}
Upgrade
In case Timefold Orbit platform is already installed then upgrade should be performed.
This guide assumes that the installation has been performed accordingly to the documentation about Timefold Orbit, by that orbit-values.yaml file is already available.
|
Preparation
Depending on the target version of the platform you might need to follow preparation steps. Some might be required some might be optional depending on your platform installation.
0.16.0 version
-
The location sets endpoints were changed to using hyphens instead of camel case to separate the words (
/api/admin/v1/tenants/{tenantId}/maps/location-sets). -
It’s possible to configure data cleanup policy to remove data sets after
xdays. This can be set viaorbit-values.yamlfile with following sectionstorage: # remote storage that is used to store solver data sets remote: # specifies expiration of data sets in remote storage in days - once elapsed data will be removed. When set to 0 no expiration expiration: 7This feature is not supported for Azure storage as it requires higher privileges to configure life cycle rules. Instead user should configure it directly in Azure Portal or CLI. -
Configuration bucket name (used to store internal data of the platform) is now configurable. This is required to be updated for S3 and Google Cloud Storage setups as bucket names must be globally unique in those object stores. Before upgrading make sure you create uniquely named bucket (using company name or domain name) and copy all files from
timefold-orbit-configurationbucket into the new one. Next set the name of the configuration bucket in theorbit-values.yamlfile under following section:storage: remote: name: YOUR_CUSTOM_BUCKET_NAMEreplacing
YOUR_CUSTOM_BUCKET_NAMEwith the name of your choice.
0.15.0 version
The location sets configuration for the maps cache, that was introduced in version 0.13.0, was removed from helm
and now it’s done via an API (/api/admin/v1/tenants/{tenantId}/maps/locationSets).
0.14.0 version
Fine-grained control over the termination of the solver has been added. The termination is configured globally and can be overridden when submitting a problem dataset. Configuring unimproved spent limit now allows to avoid running the solver when the score is not improving anymore. Setting maximum limits provides a safety net to prevent users from setting too high termination values.
Optionally, values file can be extended with models configuration that allows to set the termination settings:
-
terminationSpentLimit- maximum duration to keep the solver running - defaults to PT30M - expressed as ISO-8601 duration -
terminationMaximumSpentLimit- maximum allowed limit for dataset-defined spentLimit - defaults to PT60M - expressed as ISO-8601 duration -
terminationUnimprovedSpentLimit- if the score has not improved during this period terminate the solver - defaults to PT5M - expressed as ISO-8601 duration -
terminationMaximumUnimprovedSpentLimit- maximum allowed limit for dataset-defined unimprovedSpentLimit - defaults to PT5M - expressed as ISO-8601 duration
models:
  terminationSpentLimit: PT30M
  terminationMaximumSpentLimit: PT60M
  terminationUnimprovedSpentLimit: PT5M
  terminationMaximumUnimprovedSpentLimit: PT5M
In case you want to opt out of the unimproved spent limit, configure it with the same value as the maximum spent limit:
models:
  terminationSpentLimit: PT30M
  terminationMaximumSpentLimit: PT60M
  terminationUnimprovedSpentLimit: PT60M
  terminationMaximumUnimprovedSpentLimit: PT60M
0.13.0 version
When using maps, it’s now possible to precalculate location sets. When doing so, the location sets will be precalculated according to a refresh interval, and will be stored in a cache by their name. For details read Deploy maps integration section.
0.12.0 version
When using OSRM maps, requests are now throttled based on the memory available in each Map.
Some optional configurations were added to control the requests for the maps instances.
In addition, the configurations osrmOptions and osrmLocations were replaced by osrm.options and osrm.locations, respectively.
For details read Deploy maps integration section.
Optionally, values file can be extended with models configuration that allows to set time to live for solver worker pod:
-
runtimeTimeToLive- duration to keep the solver worker pod after solving has finished - expressed as ISO-8601 duration -
idleRuntimeTimeToLive- duration to keep the solver worker pod without solving being activated (e.g. when performing recommended fit) - defaults to 10 minutes - expressed as ISO-8601 duration
models:
  runtimeTimeToLive: PT1M
idleRuntimeTimeToLive: PT30M0.10.0 version
When using maps there is new component provided called maps-service that is automatically deployed when enabled via values file. In addition, when using OSRM dedicated maps can also be deployed. For details read Deploy maps integration section.
Maps service is equipped with caching layer that requires persistent volume in Kubernetes cluster for best performance and functionality. In case persistent volumes are not available it should be disabled in values file with maps.cache.persistentVolume: null property
|
0.8.0 version
There are no required preparation steps.
Optionally, values file can be extended with models configuration that allows to set default execution parameters.
models:
  terminationSpentLimit: 30m
   # IMPORTANT: when setting resources, all must be set
  resources:
    limits:
      # max CPU allowed for the platform to be used
      cpu: 1
      # max memory allowed for the platform to be used
      memory: 512Mi
    requests:
      # guaranteed CPU for the platform to be used
     cpu: 1
      # guaranteed memory for the platform to be used
     memory: 512Mi
  runOn:
    # will only run on nodes that are marked as solver workers
    solverWorkers: false
    # will only run on nodes that are marked with model id
    modelDedicated: false
    # will only run on nodes that are marked with tenant id
    tenantDedicated: false
Execution
Login to Timefold Helm Chart repository to gain access to Timefold Orbit chart. Use user as username and token provided by Timefold support as password.
helm registry login ghcr.io/timefoldaiOnce all preparation steps are completed, Timefold Orbit platform can be upgraded with following command:
Amazon S3 based installation
Upgrade command requires following environment variables to be set:
-
NAMESPACE - kubernetes namespace where platform should be installed
-
OAUTH_CLIENT_SECRET - client secret of the application used for this environment
-
TOKEN - GitHub access token to container registry provided by Timefold support
-
LICENSE - Timefold Orbit license string provided by Timefold support
-
AWS_ACCESS_KEY - AWS access key
-
AWS_ACCESS_SECRET - AWS access secret
Once successfully logged in with environment variables set, issue upgrade command via helm:
helm upgrade --install --atomic --namespace $NAMESPACE timefold-orbit oci://ghcr.io/timefoldai/timefold-orbit-platform  \
        -f orbit-values.yaml \
        --create-namespace \
        --set namespace=$NAMESPACE \
        --set oauth.clientSecret="$OAUTH_CLIENT_SECRET" \
        --set image.registry.auth="$TOKEN" \
        --set license="$LICENSE" \
        --set secrets.data.awsAccessKey="$AWS_ACCESS_KEY" \
        --set secrets.data.awsAccessSecret="$AWS_ACCESS_SECRET"
Above command will install (or upgrade) latest released version of the Timefold Orbit platform. To install specific version append --version A.B.C to the command where A.B.C is the version number to be used.
|
Google Cloud Storage based installation
Upgrade command requires following environment variables to be set:
-
NAMESPACE - kubernetes namespace where platform should be installed
-
OAUTH_CLIENT_SECRET - client secret of the application used for this environment
-
TOKEN - GitHub access token to container registry provided by Timefold support
-
LICENSE - Timefold Orbit license string provided by Timefold support
-
GCS_SERVICE_ACCOUNT - Service Account key for Google Cloud Storage
-
GCP_PROJECT_ID - Google Cloud Project id where storage is created
Once successfully logged in with environment variables set, issue upgrade command via helm:
helm upgrade --install --atomic --namespace $NAMESPACE timefold-orbit oci://ghcr.io/timefoldai/timefold-orbit-platform  \
        -f orbit-values.yaml \
        --create-namespace \
        --set namespace=$NAMESPACE \
        --set oauth.clientSecret="$OAUTH_CLIENT_SECRET" \
        --set image.registry.auth="$TOKEN" \
        --set license="$LICENSE" \
        --set secrets.stringData.serviceAccountKey="$GCS_SERVICE_ACCOUNT" \
        --set secrets.stringData.projectId="$GCP_PROJECT_ID"
Above command will install (or upgrade) latest released version of the Timefold Orbit platform. To install specific version append --version A.B.C to the command where A.B.C is the version number to be used.
|
Azure BlobStore based installation
Upgrade command requires following environment variables to be set:
-
NAMESPACE - kubernetes namespace where platform should be installed
-
OAUTH_CLIENT_SECRET - client secret of the application used for this environment
-
TOKEN - GitHub access token to container registry provided by Timefold support
-
LICENSE - Timefold Orbit license string provided by Timefold support
-
AZ_CONNECTION_STRING - Azure BlobStore connection string
Once successfully logged in with environment variables set, issue upgrade command via helm:
helm upgrade --install --atomic --namespace $NAMESPACE timefold-orbit oci://ghcr.io/timefoldai/timefold-orbit-platform  \
        -f orbit-values.yaml \
        --create-namespace \
        --set namespace=$NAMESPACE \
        --set oauth.clientSecret="$OAUTH_CLIENT_SECRET" \
        --set image.registry.auth="$TOKEN" \
        --set license="$LICENSE" \
        --set secrets.data.azureStoreConnectionString="$AZ_CONNECTION_STRING"
Above command will install (or upgrade) latest released version of the Timefold Orbit platform. To install specific version append --version A.B.C to the command where A.B.C is the version number to be used.
|