Getting started: Hello world
Task Scheduling model assigns jobs to machines and employees with the goal of increasing the number of jobs that can be completed and minimizing the makespan.
This guide introduces Timefold’s Task Scheduling model and walks you through the steps to use Timefold Platform to create an optimized Task Scheduling solution.
To follow the steps in this guide, you need to be registered on Timefold Platform and have access to an active tenant.
1. Start a trial
-
Navigate to https://app.timefold.ai/free-trial.
-
Click Sign up.
Either enter the company email address and password you want to register with and click continue or select one of the federated log-in options and follow the prompts.
-
Verify your email address.
-
Add your details, agree to the terms and click Start free trial.
2. Hello world
The steps in this guide can be completed in under 10 minutes:
This hello world example uses an example with 1 machine and 1 job to demonstrate the process of requesting and retrieving a solution from Timefold’s Task Scheduling model.
At the end of this guide, you will have a solution for the Task Scheduling hello world problem.
This hello world uses the POST and GET methods and the API endpoint: https://app.timefold.ai/api/models/job-scheduling/v1/schedules
3. Create a problem dataset
A dataset for the Task Scheduling model must include information about your jobs and your machines' availability.
The following is an example Task Scheduling input dataset:
{
  "config": {
    "run": {
      "name": "Getting started example"
    }
  },
  "modelInput": {
    "machines": [
      {
        "id": "machine1",
        "start": "2027-02-01T00:00:00+00:00"
      }
    ],
    "jobs": [
      {
        "id": "red-1",
        "duration": "PT96H"
      }
    ]
  }
}
Copy this example dataset into a file called sample.json to use in this hello world example.
|
The modelInput object of the dataset contains the data to be optimized.
At a minimum, modelInput must include machines and jobs:
4. Machines
In this example, there is 1 machine.
machines includes an id and start.
-
idis a unique identifier that identifies the machine. -
startis the earliest time jobs can be assigned to this machine in ISO 8601 date and time format.
{
  "machines": [
    {
      "id": "Machine 1",
      "start": "2027-02-01T00:00:00+00:00"
    }
  ]
}| Learn about additional options that can be included for machines and employees in the Machine and employee resource constraints guides. |
4.1. Jobs
In this example, there is 1 job.
jobs includes an id and duration.
-
idis a unique identifier that identifies the job. -
durationis the duration the job will take in ISO 8601 duration format.
{
  "jobs": [
    {
      "id": "red-1",
      "duration": "PT96H"
    }
  ]
}| Learn about additional options that can be included for jobs in the Job service constraints guides. |
When the dataset is posted to Timefold, Timefold will attempt to assign jobs to machines or employees, while considering the constraints of the domain.
5. Post the dataset
You have two options to post the dataset.
5.1. Post the dataset in the Timefold Platform UI
Typically, you post the dataset to the API. However, for testing purposes, you can upload your sample.json file directly in the Timefold Platform UI:
-
Log into the Timefold Platform dashboard: https://app.timefold.ai
-
Select the Task Scheduling tile.
-
Click New plan.
-
Select Custom and click Next
-
Upload the
sample.jsonfile you saved earlier. -
Click Next, then click Run.
5.2. Post the dataset to the Timefold API
You need an API key to access the API.
Learn how to configure an API Key to run the examples in this guide:
-
Log in to Timefold Platform: app.timefold.ai.
-
From the Dashboard, click your tenant, and from the drop-down menu select Manage tenant, then choose API Keys.
-
Create a new API key or use an existing one. Ensure the list of models for the API key contains the current model.
In the examples, replace <API_KEY> with the API Key you just copied.
POST the dataset contained in the sample.json file for solving to the API endpoint: https://app.timefold.ai/api/models/job-scheduling/v1/schedules
curl -X POST -H "Content-type: application/json" -H 'X-API-KEY: <API_KEY> https://app.timefold.ai/api/models/job-scheduling/v1/schedules/ [email protected]
The dataset will be validated. If the dataset is valid you will receive a response similar to:
{
  "id": "ID4",
  "parentId": null,
  "originId": "ID",
  "name": "Getting started example",
  "submitDateTime": "2025-09-17T08:54:37.436137378Z",
  "startDateTime": null,
  "activeDateTime": null,
  "completeDateTime": null,
  "shutdownDateTime": null,
  "solverStatus": "SOLVING_SCHEDULED",
  "score": null,
  "tags": [
    "system.profile:Maximum",
    "system.type:from-request"
  ],
  "validationResult": null
}
The output includes an ID that has been assigned to the dataset.
You’ll use this ID to retrieve the solution for your dataset.
solverStatus confirms the dataset has been scheduled for solving.
6. Request the solution
Append the <ID> from the output you received to the endpoint https://app.timefold.ai/api/models/job-scheduling/v1/schedules and create a GET request to retrieve the solution:
curl -X GET -H 'X-API-KEY: <API_KEY>' https://app.timefold.ai/api/models/job-scheduling/v1/schedules/<ID>
{
  "metadata": {
    "id": "ID",
    "parentId": null,
    "originId": "ID",
    "name": "Getting started example",
    "submitDateTime": "2025-09-17T07:24:14.691977742Z",
    "startDateTime": "2025-09-17T07:24:27.696434502Z",
    "activeDateTime": "2025-09-17T07:24:27.738910983Z",
    "completeDateTime": "2025-09-17T07:24:32.966766331Z",
    "shutdownDateTime": "2025-09-17T07:24:33.172132074Z",
    "solverStatus": "SOLVING_COMPLETED",
    "score": "0hard/0medium/-5760soft",
    "tags": [
      "system.type:from-request",
      "system.profile:default"
    ],
    "validationResult": {
      "summary": "OK"
    }
  },
  "modelOutput": {
    "machines": [
      {
        "id": "machine1",
        "schedule": [
          {
            "id": "red-1",
            "start": "2027-02-01T00:00:00Z",
            "end": "2027-02-05T00:00:00Z"
          }
        ]
      }
    ]
  },
  "inputMetrics": {
    "jobs": 1,
    "machines": 1,
    "employees": 0
  },
  "kpis": {
    "makespan": "PT96H",
    "unassignedJobs": 0,
    "assignedJobs": 1,
    "activatedMachines": 1,
    "activatedEmployees": 0,
    "idealEndTimeDeviation": "PT0S"
  },
  "run": {
    "id": "5b335e71-cd06-4353-a0fb-f36d899f8cb5",
    "parentId": null,
    "originId": "5b335e71-cd06-4353-a0fb-f36d899f8cb5",
    "name": "Getting started example",
    "submitDateTime": "2025-09-17T07:24:14.691977742Z",
    "startDateTime": "2025-09-17T07:24:27.696434502Z",
    "activeDateTime": "2025-09-17T07:24:27.738910983Z",
    "completeDateTime": "2025-09-17T07:24:32.966766331Z",
    "shutdownDateTime": "2025-09-17T07:24:33.172132074Z",
    "solverStatus": "SOLVING_COMPLETED",
    "score": "0hard/0medium/-5760soft",
    "tags": [
      "system.type:from-request",
      "system.profile:default"
    ],
    "validationResult": {
      "summary": "OK"
    }
  }
}
The output shows the solverStatus is SOLVING COMPLETED.
modelOutput contains the solution for the dataset.
{
  "modelOutput": {
    "machines": [
      {
        "id": "machine1",
        "schedule": [
          {
            "id": "red-1",
            "start": "2027-02-01T00:00:00Z",
            "end": "2027-02-05T00:00:00Z"
          }
        ]
      }
    ]
  }
}
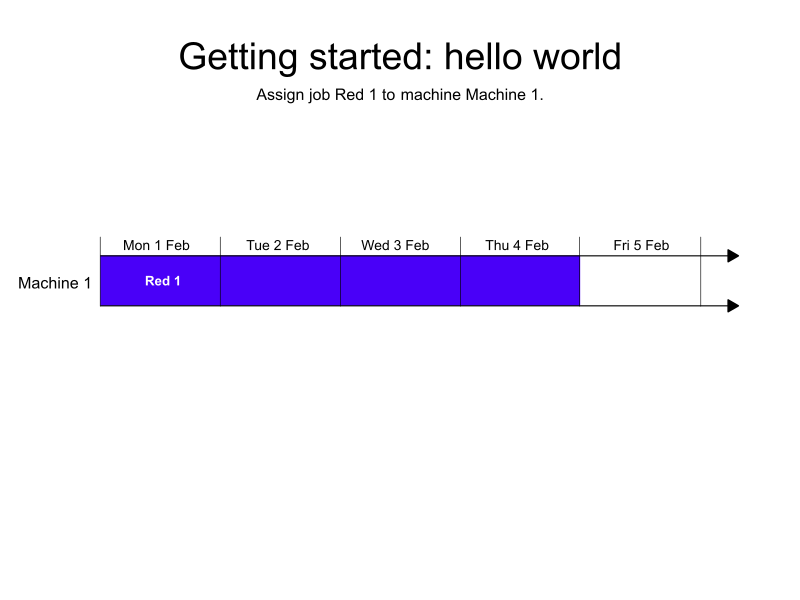
The job Red 1 is assigned to Machine 1 from February 1st at 00:00 until February 5th at 00:00.
Next
-
See the full API spec, try the online API, or start a free trial.
-
Configure a webhook.
-
Try the Demo datasets.